Avatar Export workflow
Generally, exporting avatars from Blender for Unity is tiresome, non-reproducible and destructive. I used to create a copy of my current blend file, apply all modifiers manually, select everything and export to fbx for Unity. If I had to change something in Blender, I had to go back into the original file, make my changes and then repeat the new file > apply > export cycle.
How to prep and export a model from Blender in just a few clicks
This method uses Avatar builder (free), gret (free, get at lease version 0.3.1) and Better FBX Exporter (paid) addons. Better FBX Exporter is not required, but I use it for better Unity support in the FBX file. You can still use the default Blender FBX exporter.
1) In the Avatar Builder panel, create new Build settings (and name if you want).
2) Select all (shift click) objects you want to export (including Armature) and click Add in the panel.
- If everything is in a collection: right click the collection > Select objects.
3) Settings:
- Uncheck
Ignore hidden objectsif you need some hidden things (such as toggles), or keep it checked and unhide everything you need. - Use
Reduce to two meshesto keep the model file size down: shapekeys increase file size per vertex in the object so keeping them separate helps that.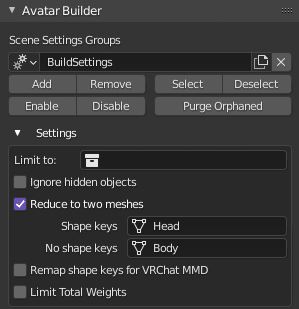
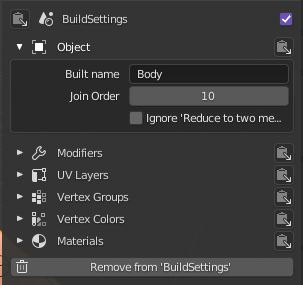
4) In each object’s Object Settings:
- Head and anything with shapekeys:
- Change
Modifiers>Apply modifierstoApply with shapes (gret addon)
- Change
- Anything you want to keep separate for toggles or animating:
- Object > Check
Ignore 'Reduce to two meshes' - Object > Change the
Built nameto the same name as another object to join them in the final export (such as all objects of a jacket to Jacket)
- Object > Check
- You can play with join order if the order of shapekeys and/or material slots is important to you. By default, leaving everything at 10 will mean that the object with the most shapekeys will be first.
5) Click Build Avatar.
6) Select everything, File > Export > Better FBX Exporter.
7) FBX Exporter settings (you can set these as a preset top right for future exports):
- Check
Selected objects only - Scroll down and uncheck
Ignore Armature Node - Name your FBX and press export
You can then easily reuse the build settings to rebuild your avatar in the same way in one click after changing your model. Once you’ve exported the FBX from Blender, you can copy and paste it directly into the Unity project files to replace the previous FBX and it will reimport automatically with the same FBX settings as before.